Unit 1
1) What is android? Explain with its features.
What is Android?
Android is an open-source mobile operating system based on the Linux kernel, primarily designed for touchscreen devices like smartphones, tablets, and smart TVs. It was initially developed by Android Inc. and later acquired by Google in 2005. The first commercial Android device was released in 2008. Android provides a flexible and customizable environment for app developers and offers a vast ecosystem of applications via the Google Play Store.
Features of Android:
- Open-Source – Android’s source code is freely available, allowing developers and manufacturers to modify and customize it.
- Customizable UI – Users can personalize themes, widgets, and layouts according to their preferences.
- Multiple Device Compatibility – Supports a variety of devices, including smartphones, tablets, smartwatches, TVs, and even cars.
- Google Services Integration – Seamless access to Google apps like Gmail, Maps, Drive, and Play Store.
- Multitasking – Allows users to run multiple applications simultaneously.
- Connectivity Options – Supports Wi-Fi, Bluetooth, NFC, 4G/5G, and USB connections.
- Application Framework – Provides APIs for developers to create powerful applications.
- Security Features – Includes built-in security tools like Google Play Protect, app permissions, and encryption.
- Regular Updates – Google releases frequent updates to enhance performance and security.
- Support for Various Programming Languages – Developers can build Android apps using Java, Kotlin, C++, and Python.
These features make Android a widely used and powerful operating system for mobile devices.
2) Explain Android software stack in detail.
Android Software Stack
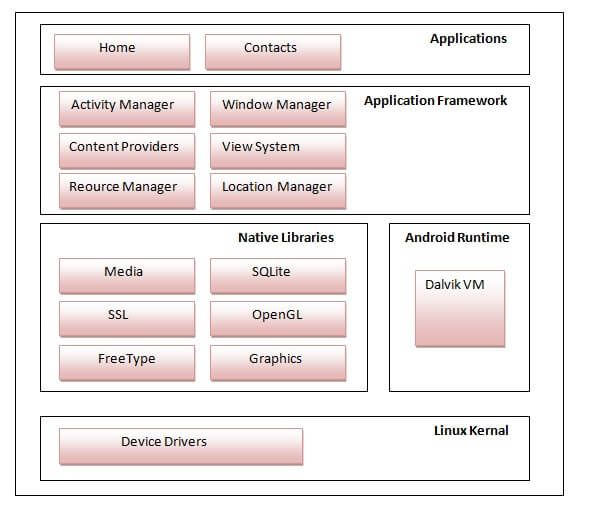
The Android software stack, also known as the Android architecture, is a layered structure that provides the necessary components to develop and run Android applications. It consists of five main layers, each serving a specific function.
1. Linux Kernel
- The foundation of the Android operating system.
- Manages device drivers, memory management, power management, process management, and networking.
- Provides an abstraction layer between hardware and the rest of the software stack.
- Examples: Display Driver, Camera Driver, Flash Memory Driver, Audio Driver, Binder (IPC) Driver.
2. Native Libraries (Middleware)
- Built on top of the Linux kernel, these libraries provide core functionalities of Android.
- Written in C/C++ and include essential libraries like:
- WebKit – For web browsing.
- SQLite – Lightweight database for local storage.
- OpenGL ES – Handles 2D/3D graphics rendering.
- Media Framework – Supports audio and video playback.
- FreeType – For font rendering.
- SSL – For secure internet communications.
3. Android Runtime (ART) & Core Libraries
- ART (Android Runtime):
- Replaces Dalvik Virtual Machine (DVM) in newer versions.
- Uses Ahead-of-Time (AOT) Compilation for better performance.
- Manages memory, executes apps, and optimizes performance.
- Core Libraries:
- Provides essential Java libraries for Android development.
- Includes libraries for data structures, graphics, and file handling.
4. Application Framework
- Provides APIs and services that developers use to create applications.
- Key components include:
- Activity Manager – Manages app lifecycle and back stack.
- Content Providers – Enables data sharing between apps.
- Resource Manager – Handles external resources (UI layouts, images, strings).
- Notification Manager – Controls status bar notifications.
- Location Manager – Provides location tracking using GPS or Wi-Fi.
5. Applications
- The topmost layer where user applications reside.
- Includes built-in apps (Phone, Contacts, Messages, Browser) and third-party apps installed via the Play Store.
This structured software stack ensures that Android applications run smoothly while maintaining security, efficiency, and compatibility across various devices.
3) Explain with diagram the Android platform architecture.
Android Platform Architecture
Android platform architecture is structured into multiple layers, each providing essential functionalities to support application development and execution. The architecture consists of five main layers, as shown in the diagram below.
Diagram of Android Platform Architecture
1. Applications
- The topmost layer where user applications and pre-installed system apps (such as Phone, Contacts, and Browser) reside.
- Applications interact with the Application Framework to access system resources.
2. Application Framework
- Provides APIs to developers for building Android apps.
- Key components include:
- Activity Manager – Manages app lifecycle and navigation.
- Content Providers – Enables data sharing between apps.
- Notification Manager – Handles app notifications.
- Resource Manager – Manages UI elements like strings, images, and layouts.
3. Android Runtime & Native Libraries
- Android Runtime (ART):
- Replaces the older Dalvik Virtual Machine.
- Uses Ahead-of-Time (AOT) Compilation for better performance.
- Native Libraries:
- Built using C/C++, providing essential system functionalities.
- Includes libraries for graphics, multimedia, databases, and web browsing.
- Examples:
- SQLite – Database management.
- OpenGL ES – Graphics rendering.
- Media Framework – Audio and video playback.
4. Hardware Abstraction Layer (HAL)
- Acts as a bridge between hardware and software.
- Provides standard interfaces for communication between the Android system and device hardware (camera, audio, sensors, etc.).
5. Linux Kernel
- The core layer that interacts directly with the hardware.
- Manages process scheduling, memory, drivers, networking, and security.
- Ensures device stability and efficiency.
This layered structure enables Android to provide flexibility, security, and compatibility across various devices.
4) Explain the Android Virtual Machine.
Android Virtual Machine (AVM)
Android Virtual Machine (AVM) is responsible for running Android applications efficiently on different hardware devices. Initially, Android used the Dalvik Virtual Machine (DVM), which was later replaced by the Android Runtime (ART) for better performance.
1. Dalvik Virtual Machine (DVM)
- Used in Android versions up to 4.4 (KitKat).
- Optimized for low memory and battery consumption.
- Uses Just-In-Time (JIT) Compilation, which translates bytecode into machine code at runtime.
- Runs DEX (Dalvik Executable) files, which are optimized for mobile devices.
- Supports multiple instances, allowing apps to run in their own isolated environments.
2. Android Runtime (ART)
- Introduced in Android 4.4 (KitKat) and made the default runtime in Android 5.0 (Lollipop).
- Uses Ahead-Of-Time (AOT) Compilation, which compiles apps into native machine code during installation.
- Improves app performance, startup speed, and battery life.
- Supports Garbage Collection (GC), reducing memory leaks and improving memory management.
- Runs DEX files, but with precompiled native code for faster execution.
Key Differences Between DVM and ART
| Feature | Dalvik VM (DVM) | Android Runtime (ART) |
|---|---|---|
| Compilation Method | Just-In-Time (JIT) | Ahead-Of-Time (AOT) |
| Performance | Slower | Faster |
| Memory Efficiency | Optimized for low memory | Uses more storage for precompiled code |
| Execution Speed | Converts bytecode at runtime | Precompiles code during installation |
| Battery Consumption | Higher due to runtime compilation | Lower due to precompiled execution |
Conclusion
Android Runtime (ART) has replaced Dalvik VM due to its better performance, energy efficiency, and smoother app execution. It enables faster and more optimized Android applications while maintaining backward compatibility.
5) Write down the steps to create AVD (Android Virtual Device).
Steps to Create AVD (Android Virtual Device)
-
Open Android Studio
- Launch Android Studio on your computer.
-
Open AVD Manager
- Click on Tools in the top menu.
- Select AVD Manager from the dropdown.
-
Create a New Virtual Device
- In the AVD Manager window, click on Create Virtual Device.
-
Select Hardware
- Choose a device model (e.g., Pixel 6, Nexus 5X).
- Click Next.
-
Select a System Image
- Choose an Android version (API level) for the virtual device.
- If not downloaded, click Download next to the version you want.
- Click Next after selection.
-
Configure AVD Settings
- Set RAM, Storage, and Graphics options (default settings work fine).
- Optionally, modify device orientation and scale.
- Click Finish.
-
Launch the AVD
- In the AVD Manager, find your newly created virtual device.
- Click Run (▶️ Play button) to start the emulator.
Now, the Android Virtual Device is ready for testing applications.
6) Write down the steps to create Android Application.
Steps to Create an Android Application
-
Open Android Studio
- Launch Android Studio on your computer.
-
Start a New Project
- Click on “Start a new Android Studio project”.
-
Select a Project Template
- Choose a template such as Empty Activity and click Next.
-
Configure the Project
- Enter Application Name (e.g., “MyFirstApp”).
- Select Programming Language (Java or Kotlin).
- Set Minimum SDK (e.g., API 21 for Android 5.0 Lollipop).
- Click Finish.
-
Wait for Project Setup
- Android Studio will create the necessary files and build the project.
-
Design the User Interface (UI)
- Open res/layout/activity_main.xml.
- Add UI elements like TextView, Button, EditText using XML or the Design view.
-
Write the Application Logic
- Open MainActivity.java (or .kt for Kotlin).
- Add functionality, such as handling button clicks.
- Example:
Button myButton = findViewById(R.id.button);
myButton.setOnClickListener(new View.OnClickListener() {
    @Override
    public void onClick(View v) {
        Toast.makeText(MainActivity.this, "Button Clicked!", Toast.LENGTH_SHORT).show();
    }
});
-
Run the Application
- Click Run (▶️ Play button) or press Shift + F10.
- Choose an Android Emulator (AVD) or a connected physical device.
-
Test and Debug
- Use Logcat to check for errors.
- Modify and improve the app as needed.
-
Build and Generate APK
- Click Build > Build Bundle(s) / APK(s) > Build APK.
- Install the APK on a physical device for testing.
Now, your Android application is successfully created and running.
7) Explain the Android Manifest File and its common settings in detail.
Android Manifest File and Its Common Settings
The Android Manifest file (AndroidManifest.xml) is an essential configuration file in every Android application. It provides information about the app to the Android system, including its components, permissions, hardware features, and app metadata.
Location and Structure
- The
AndroidManifest.xmlfile is located in the root directory of every Android project inside theapp/src/main/folder. - It follows XML format and must begin with the
<manifest>root element.
Common Settings in Android Manifest
-
Manifest Root Element (
<manifest>)- Declares the package name of the app, which acts as a unique identifier.
- Example:
<manifest xmlns:android="http://schemas.android.com/apk/res/android"
    package="com.example.myapp">
-
Application Tag (
<application>)- Defines application-wide settings such as icons, themes, and app components.
- Example:
<application
    android:allowBackup="true"
    android:icon="@mipmap/ic_launcher"
    android:label="@string/app_name"
    android:theme="@style/Theme.MyApp">
-
Activity Declaration (
<activity>)- Specifies each screen (activity) of the app.
- The
intent-filterwithMAINandLAUNCHERactions marks the entry point of the app. - Example:
<activity android:name=".MainActivity">
    <intent-filter>
        <action android:name="android.intent.action.MAIN" />
        <category android:name="android.intent.category.LAUNCHER" />
    </intent-filter>
</activity>
-
Permissions (
<uses-permission>)- Defines the permissions required by the app to access device resources (e.g., camera, internet).
- Example:
<uses-permission android:name="android.permission.INTERNET" />
<uses-permission android:name="android.permission.CAMERA" />
-
Service Declaration (
<service>)- Used for background processing like playing music or syncing data.
- Example:
<service android:name=".MyBackgroundService" />
-
Broadcast Receiver (
<receiver>)- Registers components that respond to system-wide broadcast events (e.g., battery low, boot completed).
- Example:
<receiver android:name=".MyReceiver">
    <intent-filter>
        <action android:name="android.intent.action.BOOT_COMPLETED" />
    </intent-filter>
</receiver>
-
Content Provider (
<provider>)- Allows data sharing between applications using a structured interface.
- Example:
<provider
    android:name=".MyContentProvider"
    android:authorities="com.example.myapp.provider"
    android:exported="false" />
-
Hardware and Software Features (
<uses-feature>)- Declares required hardware or software capabilities.
- Example:
<uses-feature android:name="android.hardware.camera" android:required="true" />
-
Minimum and Target SDK Versions (
<uses-sdk>)- Specifies compatibility with Android versions.
- Example:
<uses-sdk android:minSdkVersion="21" android:targetSdkVersion="33" />
Conclusion
The Android Manifest file is crucial for defining an app’s structure, permissions, components, and device compatibility. It helps Android understand how the app should function within the system.
8) What are resources? Explain different types of resources in detail.
Resources in Android
Resources in Android refer to external elements such as layouts, strings, images, colors, and themes that are separate from the code. Storing these elements in XML files under the res/ directory allows developers to manage UI elements efficiently and support multiple devices, languages, and screen configurations.
Types of Android Resources
-
Drawable Resources (
res/drawable/)- Used for storing images, icons, and graphical elements.
- Supports formats like PNG, JPG, WebP, and VectorDrawable.
- Example: Adding an image in
res/drawable/logo.png, then using it in XML:<ImageView android:src="@drawable/logo" />
-
Layout Resources (
res/layout/)- Defines UI structure using XML.
- Used in Activities and Fragments to create screens.
- Example:
activity_main.xml<LinearLayout xmlns:android="http://schemas.android.com/apk/res/android" android:layout_width="match_parent" android:layout_height="match_parent"> <TextView android:text="Hello, World!" /> </LinearLayout>
-
String Resources (
res/values/strings.xml)- Stores text values for better localization support.
- Example:
<string name="app_name">My Application</string> - Usage in XML:
<TextView android:text="@string/app_name" />
-
Color Resources (
res/values/colors.xml)- Defines colors for UI components.
- Example:
<color name="primary_color">#6200EE</color> - Usage in XML:
<TextView android:textColor="@color/primary_color" />
-
Dimen Resources (
res/values/dimens.xml)- Stores dimensions like padding, margin, text size for consistency.
- Example:
<dimen name="text_size">16sp</dimen> - Usage in XML:
<TextView android:textSize="@dimen/text_size" />
-
Style and Theme Resources (
res/values/styles.xml)- Defines global appearance settings for UI elements.
- Example:
<style name="MyTheme" parent="Theme.MaterialComponents.Light"> <item name="colorPrimary">@color/primary_color</item> </style> - Usage in
AndroidManifest.xml:<application android:theme="@style/MyTheme" />
-
Menu Resources (
res/menu/)- Stores XML files for app menus like options menus and context menus.
- Example:
menu.xml<menu xmlns:android="http://schemas.android.com/apk/res/android"> <item android:id="@+id/settings" android:title="Settings" /> </menu>
-
Animation Resources (
res/anim/)- Defines animation effects for UI elements.
- Example:
fade_in.xml<alpha xmlns:android="http://schemas.android.com/apk/res/android" android:fromAlpha="0.0" android:toAlpha="1.0" android:duration="500" />
-
Raw Resources (
res/raw/)- Stores media files (MP3, JSON, TXT) that apps need to process.
- Example: Access a JSON file stored in
res/raw/data.json:InputStream is = getResources().openRawResource(R.raw.data);
-
Font Resources (
res/font/)
- Stores custom fonts that can be applied to text elements.
- Example: Adding
custom_font.ttftores/font/and using it:<TextView android:fontFamily="@font/custom_font" />
Conclusion
Android resources help in managing UI elements efficiently, making applications scalable, customizable, and adaptable to different devices and languages.
9) Explain dalvik virtual machine.
Dalvik Virtual Machine (DVM)
Dalvik Virtual Machine (DVM) is a register-based virtual machine used in early versions of Android to execute applications. It was designed by Google to optimize performance on low-memory and battery-constrained devices.
Features of Dalvik Virtual Machine
- Optimized for Mobile Devices – Uses a register-based architecture for efficient memory usage.
- Runs DEX Files – Converts Java bytecode into Dalvik Executable (DEX) format for better performance.
- Just-In-Time (JIT) Compilation – Translates bytecode into machine code at runtime to speed up execution.
- Supports Multiple Instances – Each Android app runs in its own instance of DVM, ensuring sandboxing.
- Garbage Collection – Manages memory efficiently by automatically freeing unused resources.
Dalvik vs. Java Virtual Machine (JVM)
| Feature | Dalvik VM (DVM) | Java VM (JVM) |
|---|---|---|
| Architecture | Register-based | Stack-based |
| Execution File | DEX (Dalvik Executable) | Java Bytecode |
| Performance | Optimized for mobile | Designed for desktops/servers |
| Memory Usage | Low | Higher |
| Compilation | JIT (Just-In-Time) | JIT/AOT (Ahead-Of-Time) |
Why Dalvik Was Replaced?
With the release of Android 5.0 (Lollipop), Dalvik was replaced by Android Runtime (ART) due to:
- Better performance (ART uses Ahead-of-Time (AOT) compilation).
- Reduced power consumption.
- Faster app startup times.
Dalvik was an essential part of early Android versions, but ART is now the default runtime for modern Android devices.
10) Describe the android activity life cycle with suitable diagram.
Android Activity Lifecycle
An Activity in Android represents a single screen in an application. The Activity Lifecycle defines how an activity behaves from creation to destruction as a user interacts with the app. Android manages this lifecycle using different callback methods.
Diagram of Android Activity Lifecycle
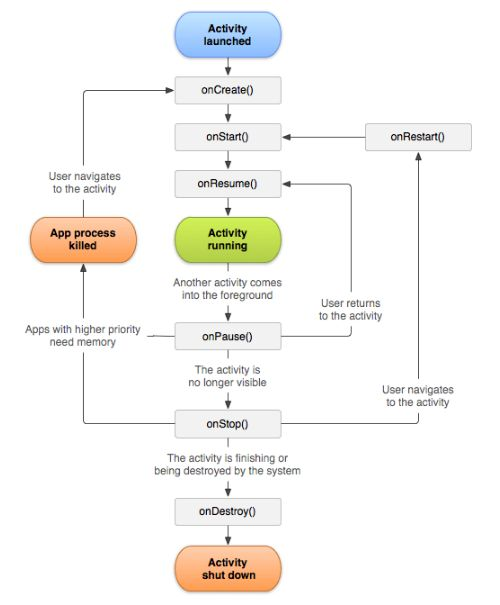
Stages of Activity Lifecycle
-
onCreate()
- Called when the activity is first created.
- Initializes components like UI elements and variables.
- Example:
@Override
protected void onCreate(Bundle savedInstanceState) {
    super.onCreate(savedInstanceState);
    setContentView(R.layout.activity_main);
}
-
onStart()
- Called when the activity becomes visible but is not yet interactive.
- Prepares the UI for display.
-
onResume()
- Called when the activity is in the foreground and ready for user interaction.
- The user can now interact with buttons, text fields, etc.
-
onPause()
- Called when the activity is partially visible (e.g., another activity opens on top).
- Used to pause ongoing tasks (e.g., video playback).
-
onStop()
- Called when the activity is no longer visible to the user.
- Used to save data or release resources.
-
onDestroy()
- Called before the activity is completely removed from memory.
- Used for final clean-up operations.
-
onRestart() (Optional)
- Called when the activity is coming back to the foreground after being stopped.
Conclusion
The Android Activity Lifecycle ensures smooth app behavior and proper resource management, helping developers handle app transitions efficiently.
11) Write down the Java pseudo code for android spinner.
Java Pseudo Code for Android Spinner
// Import required Android packages
import android.os.Bundle;
import android.view.View;
import android.widget.AdapterView;
import android.widget.ArrayAdapter;
import android.widget.Spinner;
import android.widget.Toast;
import androidx.appcompat.app.AppCompatActivity;

public class MainActivity extends AppCompatActivity {

    @Override
    protected void onCreate(Bundle savedInstanceState) {
        super.onCreate(savedInstanceState);
        setContentView(R.layout.activity_main);

        // Step 1: Initialize Spinner
        Spinner mySpinner = findViewById(R.id.spinner);

        // Step 2: Define data for Spinner (Dropdown items)
        String[] items = {"Item 1", "Item 2", "Item 3", "Item 4"};

        // Step 3: Create an ArrayAdapter to link data with Spinner
        ArrayAdapter<String> adapter = new ArrayAdapter<>(
            this,
            android.R.layout.simple_spinner_item,
            items
        );
        adapter.setDropDownViewResource(android.R.layout.simple_spinner_dropdown_item);

        // Step 4: Set Adapter to Spinner
        mySpinner.setAdapter(adapter);

        // Step 5: Handle item selection from Spinner
        mySpinner.setOnItemSelectedListener(new AdapterView.OnItemSelectedListener() {
            @Override
            public void onItemSelected(AdapterView<?> parent, View view, int position, long id) {
                String selectedItem = parent.getItemAtPosition(position).toString();
                Toast.makeText(MainActivity.this, "Selected: " + selectedItem, Toast.LENGTH_SHORT).show();
            }

            @Override
            public void onNothingSelected(AdapterView<?> parent) {
                // Do nothing if no item is selected
            }
        });
    }
}
Explanation
- Initialize the Spinner using
findViewById(R.id.spinner). - Define the list of items to be displayed in the dropdown.
- Create an ArrayAdapter to populate the Spinner with the list.
- Set the adapter to the Spinner using
setAdapter(). - Handle item selection using
setOnItemSelectedListener().
This pseudo-code provides a basic Spinner implementation, allowing users to select an item from a dropdown list in an Android application.
12) Define the usability of various layouts of android.
Usability of Various Layouts in Android
Android provides different layouts to structure the UI elements efficiently. Each layout type serves a specific purpose based on screen size, orientation, and design complexity.
Types of Layouts and Their Usability
-
LinearLayout
- Arranges elements in a single row (horizontal) or single column (vertical).
- Best for simple, one-directional UI designs.
- Example use case: Login form with TextViews, EditTexts, and Buttons.
- Example XML:
<LinearLayout
    android:orientation="vertical"
    android:layout_width="match_parent"
    android:layout_height="match_parent">
    <TextView android:text="Enter Name"/>
    <EditText android:hint="Name"/>
    <Button android:text="Submit"/>
</LinearLayout>
-
RelativeLayout (Deprecated in newer versions, replaced by ConstraintLayout)
- Allows elements to be positioned relative to each other or to the parent.
- Suitable for complex layouts with dynamic positioning.
- Example use case: Placing a “Next” button aligned to the bottom-right corner.
- Example XML:
<RelativeLayout
    android:layout_width="match_parent"
    android:layout_height="match_parent">
    <Button
        android:id="@+id/nextButton"
        android:text="Next"
        android:layout_alignParentBottom="true"
        android:layout_alignParentRight="true"/>
</RelativeLayout>
-
ConstraintLayout (Recommended for modern Android development)
- Provides a flexible and efficient way to design complex UI layouts.
- Uses constraints instead of nested layouts, improving performance.
- Example use case: Creating responsive UIs for different screen sizes.
- Example XML:
<androidx.constraintlayout.widget.ConstraintLayout
    android:layout_width="match_parent"
    android:layout_height="match_parent">
    <Button
        android:id="@+id/btn"
        android:text="Click Me"
        app:layout_constraintBottom_toBottomOf="parent"
        app:layout_constraintEnd_toEndOf="parent"/>
</androidx.constraintlayout.widget.ConstraintLayout>
-
FrameLayout
- Designed for overlapping elements, displaying one child at a time.
- Best for loading indicators, banners, or switching views dynamically.
- Example use case: Displaying a progress bar over an image.
- Example XML:
<FrameLayout
    android:layout_width="match_parent"
    android:layout_height="match_parent">
    <ImageView android:src="@drawable/image"/>
    <ProgressBar android:visibility="visible"/>
</FrameLayout>
-
TableLayout
- Arranges elements in a grid-like structure using rows and columns.
- Suitable for displaying tabular data like a calculator layout.
- Example use case: Creating a simple form with labels and input fields.
- Example XML:
<TableLayout
    android:layout_width="match_parent"
    android:layout_height="match_parent">
    <TableRow>
        <TextView android:text="Name"/>
        <EditText android:hint="Enter Name"/>
    </TableRow>
    <TableRow>
        <TextView android:text="Email"/>
        <EditText android:hint="Enter Email"/>
    </TableRow>
</TableLayout>
-
GridLayout
- Arranges items in a flexible grid format.
- Suitable for image galleries, dashboards, or chessboard-like designs.
- Example use case: Displaying product thumbnails in a shopping app.
- Example XML:
<GridLayout
    android:layout_width="match_parent"
    android:layout_height="match_parent"
    android:columnCount="2">
    <ImageView android:src="@drawable/product1"/>
    <ImageView android:src="@drawable/product2"/>
</GridLayout>
Conclusion
Each Android layout is designed for specific use cases. Choosing the right layout improves app performance, responsiveness, and user experience.
13) What is intent? Explain Types of intent with example.
Intent in Android
An Intent in Android is a messaging object used to communicate between components like activities, services, and broadcast receivers. It helps in launching activities, starting services, passing data, and triggering system events.
Types of Intent in Android
-
Explicit Intent
- Used to navigate between components within the same app.
- The target component (activity, service, or receiver) is explicitly specified.
- Example: Opening
SecondActivityfromMainActivity.
Intent intent = new Intent(MainActivity.this, SecondActivity.class); startActivity(intent); -
Implicit Intent
- Used to request an action from another app or system component without specifying the exact component.
- The system determines the best app to handle the request.
- Example: Opening a webpage in a browser.
Intent intent = new Intent(Intent.ACTION_VIEW);
intent.setData(Uri.parse("https://www.google.com"));
startActivity(intent);
Common Use Cases of Intents
| Use Case | Intent Type | Example Code |
|---|---|---|
| Open new activity | Explicit | startActivity(new Intent(this, SecondActivity.class)); |
| Open web browser | Implicit | intent.setData(Uri.parse("https://example.com")); |
| Make a phone call | Implicit | intent.setData(Uri.parse("tel:1234567890")); |
| Send an email | Implicit | intent.setType("message/rfc822"); |
| Start a service | Explicit | startService(new Intent(this, MyService.class)); |
Conclusion
Intents are a core mechanism in Android that allow smooth inter-component communication and help in performing various tasks like navigation, data transfer, and system interactions.
14) Write down the Java code for Implicit Intent.
Java Code for Implicit Intent
// Import necessary Android packages
import android.content.Intent;
import android.net.Uri;
import android.os.Bundle;
import android.view.View;
import android.widget.Button;
import androidx.appcompat.app.AppCompatActivity;

public class MainActivity extends AppCompatActivity {

    @Override
    protected void onCreate(Bundle savedInstanceState) {
        super.onCreate(savedInstanceState);
        setContentView(R.layout.activity_main);

        // Find the button in layout
        Button btnOpenWebsite = findViewById(R.id.btnOpenWebsite);

        // Set OnClickListener to handle button click
        btnOpenWebsite.setOnClickListener(new View.OnClickListener() {
            @Override
            public void onClick(View v) {
                // Create an implicit intent to open a webpage
                Intent intent = new Intent(Intent.ACTION_VIEW);
                intent.setData(Uri.parse("https://www.google.com"));

                // Start the activity
                startActivity(intent);
            }
        });
    }
}
Explanation
Intent.ACTION_VIEW– Opens a web browser.setData(Uri.parse("URL"))– Specifies the webpage to open.startActivity(intent)– Launches the browser with the given URL.
This code demonstrates Implicit Intent by opening a webpage when the button is clicked.
15) What is testing? Explain types of testing.
Testing in Android
Testing in Android ensures that an application functions correctly, performs efficiently, and remains bug-free. It involves evaluating different components of the app to detect errors before deployment.
Types of Testing in Android
-
Unit Testing
- Tests individual components like functions, methods, or classes.
- Ensures that each module works as expected.
- Example: Testing a function that calculates total price in a shopping app.
-
Integration Testing
- Checks whether multiple components work together correctly.
- Example: Verifying that a login screen successfully interacts with a backend API.
-
Functional Testing
- Validates that the application behaves according to user requirements.
- Example: Ensuring that a “Submit” button correctly sends user input to the database.
-
UI Testing (User Interface Testing)
- Checks the visual elements of the app for proper layout and responsiveness.
- Example: Ensuring that buttons, text fields, and images are correctly aligned on different screen sizes.
-
Performance Testing
- Evaluates speed, responsiveness, and stability under different conditions.
- Example: Checking app behavior when multiple processes are running in the background.
-
Security Testing
- Identifies vulnerabilities to prevent unauthorized access and data breaches.
- Example: Testing user authentication and encryption methods.
-
Compatibility Testing
- Ensures that the app functions correctly across different devices, OS versions, and screen sizes.
- Example: Running the app on multiple Android versions to check compatibility.
-
Regression Testing
- Performed after code changes to ensure that new updates do not break existing features.
- Example: Testing previous features after implementing a new payment gateway.
-
Beta Testing (User Acceptance Testing - UAT)
- Involves real users testing the app before final release.
- Example: Releasing an app to a small group of users for feedback.
Conclusion
Testing is crucial in Android development to ensure app reliability, security, and performance, leading to a better user experience.
16) Differentiate testing with debugging.
Difference Between Testing and Debugging
| Feature | Testing | Debugging |
|---|---|---|
| Definition | Process of evaluating software to identify bugs and errors. | Process of finding and fixing the root cause of a detected issue. |
| Purpose | Ensures that the application functions as expected. | Identifies and removes errors in the code. |
| Performed By | Testers (QA Engineers) or Developers. | Developers or Programmers. |
| Automation | Can be automated using tools like JUnit, Espresso, Selenium. | Mostly a manual process using debugging tools. |
| Tools Used | Android JUnit, Espresso, Robotium for UI testing. | Android Studio Debugger, Logcat, Breakpoints. |
| When It Occurs | Conducted throughout the development lifecycle. | Done after a bug is detected during testing or execution. |
| End Result | A report listing found issues. | Fixed errors leading to correct program execution. |
Conclusion
- Testing ensures that the software works correctly and meets requirements.
- Debugging is the process of analyzing and fixing issues found during testing or execution.
Both are essential for delivering a bug-free and high-quality Android application.