Unit 3
1) What is SQLite? write a short note on it?
SQLite in Android
SQLite is a lightweight, relational database management system (RDBMS) used in Android for storing structured data locally on the device. It is embedded within Android, meaning no separate server or configuration is required.
Features of SQLite
- Lightweight & Embedded – No external setup needed.
- ACID-Compliant – Ensures data integrity with Atomicity, Consistency, Isolation, and Durability.
- Uses SQL Queries – Supports CRUD operations (
CREATE,READ,UPDATE,DELETE). - Local Storage – Stores data in a single file on the device.
- Efficient & Fast – Works well for small to medium-sized applications.
Basic Example: Using SQLite in Android
1. Create a Database Helper Class (DatabaseHelper.java)
import android.content.Context;
import android.database.sqlite.SQLiteDatabase;
import android.database.sqlite.SQLiteOpenHelper;

public class DatabaseHelper extends SQLiteOpenHelper {
    private static final String DATABASE_NAME = "students.db";
    private static final int DATABASE_VERSION = 1;

    public DatabaseHelper(Context context) {
        super(context, DATABASE_NAME, null, DATABASE_VERSION);
    }

    @Override
    public void onCreate(SQLiteDatabase db) {
        String createTable = "CREATE TABLE students (id INTEGER PRIMARY KEY, name TEXT, age INTEGER)";
        db.execSQL(createTable);
    }

    @Override
    public void onUpgrade(SQLiteDatabase db, int oldVersion, int newVersion) {
        db.execSQL("DROP TABLE IF EXISTS students");
        onCreate(db);
    }
}
2. Insert Data into SQLite
SQLiteDatabase db = new DatabaseHelper(this).getWritableDatabase();
ContentValues values = new ContentValues();
values.put("name", "John Doe");
values.put("age", 20);
db.insert("students", null, values);
db.close();
Use Cases of SQLite
- Offline Applications – Stores data locally without internet.
- User Data Storage – Saves user preferences, settings, and history.
- Small to Medium Databases – Manages local data efficiently for mobile apps.
Conclusion
SQLite is a powerful and efficient local database for Android applications. It is widely used for storing structured data without requiring an internet connection.
2) Explain the concept of Broadcast Receivers in detail.
Broadcast Receivers in Android
A Broadcast Receiver in Android is a component that listens for system-wide or app-specific broadcast messages. These broadcasts notify apps about system events or custom app events, such as battery status, network changes, SMS received, etc.
Types of Broadcasts in Android
-
System Broadcasts – Sent by the Android system when an event occurs.
- Example: Battery Low, Airplane Mode Changed, Wi-Fi Connected
- Intent Action:
Intent.ACTION_BATTERY_LOW,Intent.ACTION_BOOT_COMPLETED
-
Custom Broadcasts – Sent by apps to communicate with other apps or components.
- Example: A music app can broadcast an event when a song starts playing.
- Sent using:
sendBroadcast()
Implementing a Broadcast Receiver in Android
1. Create a Broadcast Receiver Class (MyReceiver.java)
import android.content.BroadcastReceiver;
import android.content.Context;
import android.content.Intent;
import android.widget.Toast;

public class MyReceiver extends BroadcastReceiver {
    @Override
    public void onReceive(Context context, Intent intent) {
        Toast.makeText(context, "Broadcast Received!", Toast.LENGTH_SHORT).show();
    }
}
2. Register the Receiver in AndroidManifest.xml (Static Registration)
<receiver android:name=".MyReceiver">
    <intent-filter>
        <action android:name="android.intent.action.BOOT_COMPLETED"/>
    </intent-filter>
</receiver>
3. Register the Receiver Dynamically in Java (Dynamic Registration)
import android.content.IntentFilter;

MyReceiver myReceiver = new MyReceiver();
IntentFilter filter = new IntentFilter(Intent.ACTION_AIRPLANE_MODE_CHANGED);
registerReceiver(myReceiver, filter);
Sending a Custom Broadcast
1. Sending a Broadcast from an Activity
Intent intent = new Intent("com.example.CUSTOM_BROADCAST");
sendBroadcast(intent);
2. Receiving the Custom Broadcast
<receiver android:name=".MyReceiver">
    <intent-filter>
        <action android:name="com.example.CUSTOM_BROADCAST"/>
    </intent-filter>
</receiver>
Common Use Cases of Broadcast Receivers
| Event | Intent Action |
|---|---|
| Battery Low | Intent.ACTION_BATTERY_LOW |
| Network Change | ConnectivityManager.CONNECTIVITY_ACTION |
| Boot Completed | Intent.ACTION_BOOT_COMPLETED |
| Airplane Mode Changed | Intent.ACTION_AIRPLANE_MODE_CHANGED |
Conclusion
Broadcast Receivers allow apps to listen for system events or custom broadcasts. They are useful for handling background tasks, updating UI based on events, and enabling inter-app communication.
3) What is Cursor? Explain methods of Cursor class.
Cursor in Android
A Cursor in Android is an interface that provides random read and write access to the result set returned by a database query. It is used to navigate through database records retrieved from SQLite.
Key Features of Cursor
- Allows Iteration – Moves through rows in a result set.
- Provides Access to Columns – Retrieves values using column indices.
- Optimized for Performance – Handles large datasets efficiently.
- Supports Data Modification – Can update and delete records.
Common Methods of Cursor Class
| Method | Description |
|---|---|
moveToFirst() | Moves cursor to the first row. |
moveToLast() | Moves cursor to the last row. |
moveToNext() | Moves cursor to the next row. |
moveToPrevious() | Moves cursor to the previous row. |
getCount() | Returns the total number of rows in the result set. |
getColumnIndex(String columnName) | Returns the index of a column by name. |
getString(int columnIndex) | Retrieves a String value from a column. |
getInt(int columnIndex) | Retrieves an Integer value from a column. |
getDouble(int columnIndex) | Retrieves a Double value from a column. |
isAfterLast() | Returns true if the cursor is after the last row. |
isBeforeFirst() | Returns true if the cursor is before the first row. |
close() | Closes the cursor to release resources. |
Example: Using Cursor to Read Data from SQLite
import android.database.Cursor;
import android.database.sqlite.SQLiteDatabase;
import android.widget.Toast;

public void fetchData() {
    SQLiteDatabase db = new DatabaseHelper(this).getReadableDatabase();
    Cursor cursor = db.rawQuery("SELECT * FROM students", null);

    if (cursor.moveToFirst()) {  // Move to first record
        do {
            int id = cursor.getInt(cursor.getColumnIndex("id"));
            String name = cursor.getString(cursor.getColumnIndex("name"));
            int age = cursor.getInt(cursor.getColumnIndex("age"));

            Toast.makeText(this, "ID: " + id + ", Name: " + name + ", Age: " + age, Toast.LENGTH_SHORT).show();
        } while (cursor.moveToNext());  // Move to next record
    }

    cursor.close();  // Close cursor after use
    db.close();
}
Conclusion
The Cursor class is essential for working with SQLite databases in Android. It provides efficient data retrieval methods and helps in iterating, modifying, and accessing database records.
4) Explain SQLite Open Helper with example.
SQLiteOpenHelper in Android
SQLiteOpenHelper is an abstract class in Android that provides an easy way to manage SQLite databases. It helps in creating, upgrading, and managing database versions without writing complex SQL code manually.
Key Features of SQLiteOpenHelper
- Manages Database Creation & Versioning – Automatically handles database creation and schema upgrades.
- Efficient Database Access – Uses caching to improve performance.
- Handles Migrations – Upgrades or downgrades the database when the version changes.
- Prevents Memory Leaks – Helps in managing database connections efficiently.
Steps to Implement SQLiteOpenHelper
1. Create a Database Helper Class (DatabaseHelper.java)
import android.content.Context;
import android.database.sqlite.SQLiteDatabase;
import android.database.sqlite.SQLiteOpenHelper;

public class DatabaseHelper extends SQLiteOpenHelper {

    // Database Name and Version
    private static final String DATABASE_NAME = "students.db";
    private static final int DATABASE_VERSION = 1;

    // Table Creation Query
    private static final String CREATE_TABLE =
        "CREATE TABLE students (id INTEGER PRIMARY KEY AUTOINCREMENT, name TEXT, age INTEGER)";

    public DatabaseHelper(Context context) {
        super(context, DATABASE_NAME, null, DATABASE_VERSION);
    }

    // Called when the database is created
    @Override
    public void onCreate(SQLiteDatabase db) {
        db.execSQL(CREATE_TABLE);
    }

    // Called when the database version is updated
    @Override
    public void onUpgrade(SQLiteDatabase db, int oldVersion, int newVersion) {
        db.execSQL("DROP TABLE IF EXISTS students"); // Remove old table
        onCreate(db); // Create new table
    }
}
2. Insert Data into Database (MainActivity.java)
import android.content.ContentValues;
import android.database.sqlite.SQLiteDatabase;
import android.os.Bundle;
import android.widget.Toast;
import androidx.appcompat.app.AppCompatActivity;

public class MainActivity extends AppCompatActivity {
    @Override
    protected void onCreate(Bundle savedInstanceState) {
        super.onCreate(savedInstanceState);
        setContentView(R.layout.activity_main);

        DatabaseHelper dbHelper = new DatabaseHelper(this);
        SQLiteDatabase db = dbHelper.getWritableDatabase();

        ContentValues values = new ContentValues();
        values.put("name", "John Doe");
        values.put("age", 25);

        long result = db.insert("students", null, values);
        db.close();

        if (result != -1) {
            Toast.makeText(this, "Data Inserted Successfully!", Toast.LENGTH_SHORT).show();
        }
    }
}
Methods in SQLiteOpenHelper
| Method | Description |
|---|---|
onCreate(SQLiteDatabase db) | Called when the database is created for the first time. |
onUpgrade(SQLiteDatabase db, int oldVersion, int newVersion) | Called when the database version is changed. |
getReadableDatabase() | Returns a read-only instance of the database. |
getWritableDatabase() | Returns a read/write instance of the database. |
close() | Closes the database connection. |
Conclusion
SQLiteOpenHelper simplifies database management by handling creation, upgrades, and version control automatically. It is widely used in offline storage, user data management, and caching in Android apps.
5) Explain Opening and Creating Databases with the SQLite Open Helper.
Opening and Creating Databases with SQLiteOpenHelper in Android
In Android, SQLiteOpenHelper is used to create, open, and manage SQLite databases efficiently. It simplifies database handling by automatically creating or upgrading the database when needed.
Steps to Create and Open a Database Using SQLiteOpenHelper
1. Create a Database Helper Class (DatabaseHelper.java)
This class extends SQLiteOpenHelper and manages database creation and version control.
import android.content.Context;
import android.database.sqlite.SQLiteDatabase;
import android.database.sqlite.SQLiteOpenHelper;

public class DatabaseHelper extends SQLiteOpenHelper {

    // Database Name and Version
    private static final String DATABASE_NAME = "students.db";
    private static final int DATABASE_VERSION = 1;

    // Table Creation Query
    private static final String CREATE_TABLE =
        "CREATE TABLE students (id INTEGER PRIMARY KEY AUTOINCREMENT, name TEXT, age INTEGER)";

    public DatabaseHelper(Context context) {
        super(context, DATABASE_NAME, null, DATABASE_VERSION);
    }

    // Called when the database is created
    @Override
    public void onCreate(SQLiteDatabase db) {
        db.execSQL(CREATE_TABLE); // Execute SQL query to create table
    }

    // Called when the database version is updated
    @Override
    public void onUpgrade(SQLiteDatabase db, int oldVersion, int newVersion) {
        db.execSQL("DROP TABLE IF EXISTS students"); // Remove old table
        onCreate(db); // Create new table
    }
}
2. Open or Create the Database in an Activity (MainActivity.java)
To open or create a database, instantiate DatabaseHelper.
import android.database.sqlite.SQLiteDatabase;
import android.os.Bundle;
import android.widget.Toast;
import androidx.appcompat.app.AppCompatActivity;

public class MainActivity extends AppCompatActivity {

    @Override
    protected void onCreate(Bundle savedInstanceState) {
        super.onCreate(savedInstanceState);
        setContentView(R.layout.activity_main);

        // Create or open the database
        DatabaseHelper dbHelper = new DatabaseHelper(this);
        SQLiteDatabase db = dbHelper.getWritableDatabase(); // Opens the database

        if (db != null) {
            Toast.makeText(this, "Database Opened Successfully!", Toast.LENGTH_SHORT).show();
        }
    }
}
Methods Used for Opening and Creating Databases
| Method | Description |
|---|---|
getWritableDatabase() | Opens read/write access to the database (creates it if not existing). |
getReadableDatabase() | Opens the database in read-only mode. |
onCreate(SQLiteDatabase db) | Called once when the database is first created. |
onUpgrade(SQLiteDatabase db, int oldVersion, int newVersion) | Called when the database version changes, used for migrations. |
Conclusion
Using SQLiteOpenHelper, Android apps can create, open, and manage SQLite databases seamlessly. It ensures that databases are created only once, and provides methods to handle upgrades automatically, making it essential for local data storage.
6) Explain Opening and Creating Databases without the SQLite Open Helper.
Opening and Creating Databases Without SQLiteOpenHelper in Android
In Android, databases can be created and opened manually using SQLiteDatabase instead of SQLiteOpenHelper. This approach gives more control over database operations but requires manual handling of database creation and versioning.
Steps to Open and Create a Database Without SQLiteOpenHelper
1. Create or Open a Database (MainActivity.java)
We use SQLiteDatabase.openOrCreateDatabase() or SQLiteDatabase.execSQL() to create a database and table.
import android.database.sqlite.SQLiteDatabase;
import android.os.Bundle;
import android.widget.Toast;
import androidx.appcompat.app.AppCompatActivity;

public class MainActivity extends AppCompatActivity {
    @Override
    protected void onCreate(Bundle savedInstanceState) {
        super.onCreate(savedInstanceState);
        setContentView(R.layout.activity_main);

        // Step 1: Open or Create the Database
        SQLiteDatabase db = openOrCreateDatabase("students.db", MODE_PRIVATE, null);

        // Step 2: Create a Table (if not exists)
        String createTableQuery = "CREATE TABLE IF NOT EXISTS students (id INTEGER PRIMARY KEY AUTOINCREMENT, name TEXT, age INTEGER)";
        db.execSQL(createTableQuery);

        Toast.makeText(this, "Database Created Successfully!", Toast.LENGTH_SHORT).show();

        // Close the database after use
        db.close();
    }
}
2. Insert Data into the Database
Manually inserting data using execSQL().
// Open database
SQLiteDatabase db = openOrCreateDatabase("students.db", MODE_PRIVATE, null);

// Insert data
String insertQuery = "INSERT INTO students (name, age) VALUES ('John Doe', 25)";
db.execSQL(insertQuery);

// Close database
db.close();
3. Retrieve Data from the Database
Using a Cursor to fetch data.
// Open database
SQLiteDatabase db = openOrCreateDatabase("students.db", MODE_PRIVATE, null);

// Execute query
Cursor cursor = db.rawQuery("SELECT * FROM students", null);

if (cursor.moveToFirst()) {
    do {
        String name = cursor.getString(cursor.getColumnIndex("name"));
        int age = cursor.getInt(cursor.getColumnIndex("age"));
        Toast.makeText(this, "Name: " + name + ", Age: " + age, Toast.LENGTH_SHORT).show();
    } while (cursor.moveToNext());
}

// Close cursor and database
cursor.close();
db.close();
Methods Used for Manual Database Management
| Method | Description |
|---|---|
openOrCreateDatabase(name, mode, factory) | Opens or creates a database if it doesn’t exist. |
execSQL(sqlQuery) | Executes a single SQL statement (CREATE, INSERT, DELETE, etc.). |
rawQuery(sqlQuery, selectionArgs) | Executes a SELECT query and returns a Cursor. |
close() | Closes the database connection. |
Comparison: With vs. Without SQLiteOpenHelper
| Feature | Using SQLiteOpenHelper | Without SQLiteOpenHelper |
|---|---|---|
| Database Management | Automatic | Manual |
| Code Complexity | Less | More |
| Handles Upgrades | Yes | No |
| Ease of Use | Easier | Harder |
| Control Over Database | Limited | Full Control |
Conclusion
Manually opening and creating databases without SQLiteOpenHelper provides full control but requires more effort for handling versions, migrations, and optimizations. It is suitable for small projects or cases where full customization is needed.
7) Explain how to Query, insert, update and delete rows from Database.
Query, Insert, Update, and Delete Rows in SQLite Database in Android
In Android, we use SQLiteDatabase to perform CRUD (Create, Read, Update, Delete) operations on an SQLite database.
1. Inserting Data into Database
Using insert() Method (Recommended)
SQLiteDatabase db = new DatabaseHelper(this).getWritableDatabase();
ContentValues values = new ContentValues();
values.put("name", "John Doe");
values.put("age", 25);

long result = db.insert("students", null, values);
db.close();

if (result != -1) {
    Toast.makeText(this, "Data Inserted Successfully!", Toast.LENGTH_SHORT).show();
}
Using execSQL() Method (Manual SQL Query Execution)
db.execSQL("INSERT INTO students (name, age) VALUES ('Alice', 22)");2. Querying Data from Database
Using rawQuery() Method (Recommended for SELECT Queries)
SQLiteDatabase db = new DatabaseHelper(this).getReadableDatabase();
Cursor cursor = db.rawQuery("SELECT * FROM students", null);

if (cursor.moveToFirst()) {
    do {
        int id = cursor.getInt(cursor.getColumnIndex("id"));
        String name = cursor.getString(cursor.getColumnIndex("name"));
        int age = cursor.getInt(cursor.getColumnIndex("age"));

        Toast.makeText(this, "ID: " + id + ", Name: " + name + ", Age: " + age, Toast.LENGTH_SHORT).show();
    } while (cursor.moveToNext());
}

cursor.close();
db.close();
Using query() Method (Safer and More Flexible)
Cursor cursor = db.query("students", new String[]{"id", "name", "age"}, null, null, null, null, null);3. Updating Data in Database
Using update() Method (Recommended)
SQLiteDatabase db = new DatabaseHelper(this).getWritableDatabase();
ContentValues values = new ContentValues();
values.put("age", 30);  // Update age to 30

int rowsAffected = db.update("students", values, "name=?", new String[]{"John Doe"});
db.close();

if (rowsAffected > 0) {
    Toast.makeText(this, "Data Updated Successfully!", Toast.LENGTH_SHORT).show();
}
Using execSQL() Method (Manual SQL Query Execution)
db.execSQL("UPDATE students SET age = 30 WHERE name = 'Alice'");4. Deleting Data from Database
Using delete() Method (Recommended)
SQLiteDatabase db = new DatabaseHelper(this).getWritableDatabase();
int rowsDeleted = db.delete("students", "name=?", new String[]{"John Doe"});
db.close();

if (rowsDeleted > 0) {
    Toast.makeText(this, "Data Deleted Successfully!", Toast.LENGTH_SHORT).show();
}
Using execSQL() Method (Manual SQL Query Execution)
db.execSQL("DELETE FROM students WHERE name = 'Alice'");Comparison of Methods
| Operation | Recommended Method | Alternative Method |
|---|---|---|
| Insert | insert() | execSQL("INSERT INTO ...") |
| Query | query() or rawQuery() | execSQL("SELECT ...") |
| Update | update() | execSQL("UPDATE ...") |
| Delete | delete() | execSQL("DELETE ...") |
Conclusion
insert(),query(),update(), anddelete()methods are preferred because they provide better security and flexibility.execSQL()is useful for complex operations but should be used cautiously.- Always close the database and cursor after operations to prevent memory leaks.
8) What is service? Explain Service Life Cycle.
What is a Service in Android?
A Service in Android is a background component that runs without a user interface (UI). It is used for long-running operations such as playing music, downloading files, or processing data in the background.
Types of Services in Android
- Foreground Service – Runs in the background but shows a notification (e.g., music player).
- Background Service – Runs without user interaction (e.g., syncing data).
- Bound Service – Allows other components (Activities/Fragments) to bind and interact with the service.
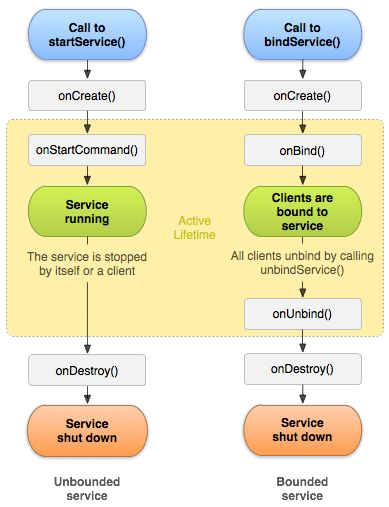
Service Lifecycle in Android
A service has three main states and follows a specific lifecycle.
Service Lifecycle Methods
| Method | Description |
|---|---|
onCreate() | Called when the service is first created. Used for initialization. |
onStartCommand() | Called when the service is started using startService(). Handles tasks in the background. |
onBind() | Called when a component binds to a bound service using bindService(). |
onUnbind() | Called when all clients unbind from a bound service. |
onDestroy() | Called when the service is stopped. Used for cleanup. |
Service Lifecycle Diagram
Example: Creating a Simple Service in Android
1. Create a Service Class (MyService.java)
import android.app.Service;
import android.content.Intent;
import android.os.IBinder;
import android.widget.Toast;

public class MyService extends Service {
    @Override
    public void onCreate() {
        super.onCreate();
        Toast.makeText(this, "Service Created", Toast.LENGTH_SHORT).show();
    }

    @Override
    public int onStartCommand(Intent intent, int flags, int startId) {
        Toast.makeText(this, "Service Started", Toast.LENGTH_SHORT).show();
        return START_STICKY; // Keeps the service running if killed
    }

    @Override
    public void onDestroy() {
        super.onDestroy();
        Toast.makeText(this, "Service Stopped", Toast.LENGTH_SHORT).show();
    }

    @Override
    public IBinder onBind(Intent intent) {
        return null; // Not a bound service
    }
}
2. Register the Service in AndroidManifest.xml
<service android:name=".MyService" />3. Start and Stop the Service from an Activity
// Start Service
Intent intent = new Intent(this, MyService.class);
startService(intent);

// Stop Service
stopService(intent);
Conclusion
A Service is used for background tasks in Android without UI. The Service Lifecycle is managed using methods like onCreate(), onStartCommand(), and onDestroy(). Services are useful for long-running operations like music playback, downloading, and background processing.
9) Explain Type of Services in android.
Types of Services in Android
Android provides three types of services based on how they are used and managed by the system:
1. Foreground Service
- Runs in the background but remains visible to the user by displaying a notification.
- Used for tasks that must run continuously (e.g., music playback, file downloading).
- Requires the
startForeground()method to show a persistent notification.
Example: Creating a Foreground Service
import android.app.Notification;
import android.app.NotificationChannel;
import android.app.NotificationManager;
import android.app.Service;
import android.content.Intent;
import android.os.IBinder;
import androidx.core.app.NotificationCompat;

public class MyForegroundService extends Service {
    private static final String CHANNEL_ID = "ForegroundServiceChannel";

    @Override
    public void onCreate() {
        super.onCreate();
        createNotificationChannel();
        Notification notification = new NotificationCompat.Builder(this, CHANNEL_ID)
                .setContentTitle("Foreground Service")
                .setContentText("Running in the background")
                .setSmallIcon(R.drawable.ic_launcher_foreground)
                .build();
        startForeground(1, notification);
    }

    @Override
    public int onStartCommand(Intent intent, int flags, int startId) {
        return START_STICKY;
    }

    @Override
    public void onDestroy() {
        stopForeground(true);
        super.onDestroy();
    }

    @Override
    public IBinder onBind(Intent intent) {
        return null;
    }

    private void createNotificationChannel() {
        NotificationChannel channel = new NotificationChannel(
                CHANNEL_ID, "Foreground Service", NotificationManager.IMPORTANCE_LOW);
        NotificationManager manager = getSystemService(NotificationManager.class);
        manager.createNotificationChannel(channel);
    }
}
Use Cases
✔ Playing music in the background
✔ Tracking user location
✔ Downloading large files
2. Background Service
- Runs in the background without user interaction.
- Does not require a persistent notification like a foreground service.
- Used for short-term tasks (e.g., syncing data, sending notifications).
- Can be stopped by the system if low on memory.
Example: Creating a Background Service
import android.app.Service;
import android.content.Intent;
import android.os.IBinder;
import android.widget.Toast;

public class MyBackgroundService extends Service {
    @Override
    public void onCreate() {
        super.onCreate();
        Toast.makeText(this, "Background Service Started", Toast.LENGTH_SHORT).show();
    }

    @Override
    public int onStartCommand(Intent intent, int flags, int startId) {
        new Thread(() -> {
            // Perform background task here
        }).start();
        return START_STICKY;
    }

    @Override
    public void onDestroy() {
        Toast.makeText(this, "Background Service Stopped", Toast.LENGTH_SHORT).show();
        super.onDestroy();
    }

    @Override
    public IBinder onBind(Intent intent) {
        return null;
    }
}
Use Cases
✔ Syncing app data in the background
✔ Sending periodic notifications
✔ Processing tasks without user interaction
3. Bound Service
- Allows other components (Activities, Fragments, or other Services) to bind to it and interact with it.
- Runs only as long as components are bound to it.
- Used when an app needs interaction with the service (e.g., fetching live data).
- Uses
onBind()method to return an IBinder interface for communication.
Example: Creating a Bound Service
import android.app.Service;
import android.content.Intent;
import android.os.Binder;
import android.os.IBinder;

public class MyBoundService extends Service {
    private final IBinder binder = new LocalBinder();

    public class LocalBinder extends Binder {
        public MyBoundService getService() {
            return MyBoundService.this;
        }
    }

    @Override
    public IBinder onBind(Intent intent) {
        return binder;
    }

    public String getMessage() {
        return "Hello from Bound Service!";
    }
}
Binding to the Service in an Activity
MyBoundService myService;
boolean isBound = false;

private ServiceConnection connection = new ServiceConnection() {
    @Override
    public void onServiceConnected(ComponentName name, IBinder service) {
        MyBoundService.LocalBinder binder = (MyBoundService.LocalBinder) service;
        myService = binder.getService();
        isBound = true;
    }

    @Override
    public void onServiceDisconnected(ComponentName name) {
        isBound = false;
    }
};

// Bind the service
Intent intent = new Intent(this, MyBoundService.class);
bindService(intent, connection, Context.BIND_AUTO_CREATE);
Use Cases
✔ Fetching live data (e.g., stock prices, weather updates)
✔ Music players with play/pause functionality
✔ Messaging apps retrieving real-time messages
Comparison of Android Service Types
| Feature | Foreground Service | Background Service | Bound Service |
|---|---|---|---|
| Runs in Background | ✅ Yes | ✅ Yes | ✅ Yes |
| User Interaction Needed? | ❌ No | ❌ No | ✅ Yes |
| Requires Notification? | ✅ Yes | ❌ No | ❌ No |
| Can Be Stopped by System? | ❌ No | ✅ Yes | ✅ Yes (if all clients unbind) |
| Example Use Cases | Music Player, GPS Tracking | Data Syncing, File Uploading | Live Chat, Streaming |
Conclusion
Android provides three types of services to handle different background tasks efficiently:
✔ Foreground Service – For long-running tasks with a visible notification.
✔ Background Service – For short-term tasks without user interaction.
✔ Bound Service – For interactive tasks where components bind to the service.
Each type plays a crucial role in app performance and user experience.
10) Explain the concept of Alarm Manager in Android.
AlarmManager in Android
AlarmManager is a system service in Android that allows applications to schedule tasks to be executed at a specific time, even if the app is not running. It is useful for background operations, reminders, notifications, and periodic tasks.
Features of AlarmManager
✔ Schedules tasks for future execution (one-time or repeating).
✔ Works even if the app is closed.
✔ Can wake up the device if required.
✔ Efficient for long-term scheduling instead of running background services continuously.
Types of Alarms in AlarmManager
| Alarm Type | Description |
|---|---|
RTC | Triggers the alarm at a specified time, based on real-time clock, but does not wake the device. |
RTC_WAKEUP | Triggers the alarm at a specified time and wakes up the device if it is asleep. |
ELAPSED_REALTIME | Triggers the alarm after a specified time, based on device uptime, without waking the device. |
ELAPSED_REALTIME_WAKEUP | Triggers the alarm after a specified time and wakes up the device if asleep. |
Example: Setting Up an Alarm Using AlarmManager
1. Register Alarm in an Activity (MainActivity.java)
import android.app.AlarmManager;
import android.app.PendingIntent;
import android.content.Context;
import android.content.Intent;
import android.os.Bundle;
import android.widget.Button;
import androidx.appcompat.app.AppCompatActivity;
import java.util.Calendar;

public class MainActivity extends AppCompatActivity {
    @Override
    protected void onCreate(Bundle savedInstanceState) {
        super.onCreate(savedInstanceState);
        setContentView(R.layout.activity_main);

        Button setAlarmButton = findViewById(R.id.setAlarmButton);
        setAlarmButton.setOnClickListener(v -> setAlarm());
    }

    private void setAlarm() {
        // Get AlarmManager instance
        AlarmManager alarmManager = (AlarmManager) getSystemService(Context.ALARM_SERVICE);

        // Define the intent to trigger when the alarm fires
        Intent intent = new Intent(this, AlarmReceiver.class);
        PendingIntent pendingIntent = PendingIntent.getBroadcast(this, 0, intent, PendingIntent.FLAG_UPDATE_CURRENT);

        // Set the alarm time (5 seconds from now)
        Calendar calendar = Calendar.getInstance();
        calendar.add(Calendar.SECOND, 5);

        // Set an exact alarm (RTC_WAKEUP wakes the device if needed)
        alarmManager.setExact(AlarmManager.RTC_WAKEUP, calendar.getTimeInMillis(), pendingIntent);
    }
}
2. Create a Broadcast Receiver (AlarmReceiver.java)
import android.content.BroadcastReceiver;
import android.content.Context;
import android.content.Intent;
import android.widget.Toast;

public class AlarmReceiver extends BroadcastReceiver {
    @Override
    public void onReceive(Context context, Intent intent) {
        Toast.makeText(context, "Alarm Triggered!", Toast.LENGTH_LONG).show();
    }
}
3. Register the Receiver in AndroidManifest.xml
<receiver android:name=".AlarmReceiver"/>Repeating Alarm Example
To repeat an alarm every 10 minutes, use:
alarmManager.setRepeating(
    AlarmManager.RTC_WAKEUP,
    calendar.getTimeInMillis(),
    AlarmManager.INTERVAL_FIFTEEN_MINUTES / 1.5, // 10 minutes
    pendingIntent
);
Canceling an Alarm
To cancel an alarm:
alarmManager.cancel(pendingIntent);Use Cases of AlarmManager
✔ Reminders and Notifications (e.g., medication reminders, meeting alerts).
✔ Background Syncing (e.g., updating weather data at regular intervals).
✔ Scheduling Long-Term Tasks (e.g., checking for app updates daily).
Conclusion
AlarmManager is used for scheduling tasks in the background at a specific time, even if the app is closed. It is useful for reminders, notifications, and periodic updates without consuming unnecessary resources.
11) What is AsyncTask? Explain it in detail.
AsyncTask in Android (Deprecated in API Level 30)
AsyncTask is a background task handler in Android that allows operations to run asynchronously on a separate thread, without blocking the main UI thread. It is mainly used for short background tasks like fetching data from the internet or performing computations.
⚠ Note: AsyncTask was deprecated in API Level 30 (Android 11) because of memory leaks and inefficient background execution. Alternatives: Use Kotlin Coroutines, Executors, or WorkManager instead.
Why Use AsyncTask?
✔ Runs tasks in the background without freezing the UI.
✔ Useful for short operations like network requests, database queries, or image processing.
✔ Provides easy UI thread interaction with onPostExecute().
AsyncTask Lifecycle Methods
| Method | Description |
|---|---|
onPreExecute() | Runs on UI thread before execution (used for setup, showing progress). |
doInBackground(Params...) | Runs in the background thread, executes the task (used for network calls, database access, etc.). |
onProgressUpdate(Progress...) | Runs on UI thread, updates the UI with progress values. |
onPostExecute(Result) | Runs on UI thread after task completion (used for updating UI with results). |
Example: Using AsyncTask in Android
1. Implement AsyncTask (DownloadTask.java)
import android.os.AsyncTask;
import android.util.Log;

public class DownloadTask extends AsyncTask<String, Integer, String> {
    @Override
    protected void onPreExecute() {
        super.onPreExecute();
        Log.d("AsyncTask", "Task Started");
    }

    @Override
    protected String doInBackground(String... urls) {
        for (int i = 0; i < 5; i++) {
            try {
                Thread.sleep(1000); // Simulate work
                publishProgress(i * 20); // Update progress
            } catch (InterruptedException e) {
                e.printStackTrace();
            }
        }
        return "Download Complete!";
    }

    @Override
    protected void onProgressUpdate(Integer... progress) {
        Log.d("AsyncTask", "Progress: " + progress[0] + "%");
    }

    @Override
    protected void onPostExecute(String result) {
        Log.d("AsyncTask", result);
    }
}
2. Execute AsyncTask from an Activity (MainActivity.java)
new DownloadTask().execute("https://example.com/file");Limitations of AsyncTask
❌ Can cause memory leaks if not handled properly.
❌ Not suitable for long-running tasks (use WorkManager instead).
❌ Runs on a single thread pool, affecting performance.
Alternatives to AsyncTask (Recommended)
✔ Kotlin Coroutines – Efficient and easy to use (GlobalScope.launch {})
✔ Executors – Uses Java’s ExecutorService for background tasks.
✔ WorkManager – Best for long-running tasks (e.g., syncing data).
Conclusion
AsyncTask was used for short background tasks but has been deprecated due to performance issues. Developers should use Kotlin Coroutines or WorkManager for modern Android development.
12) How to add notification in Android App?
How to Add Notification in an Android App
Android notifications allow apps to send messages, alerts, or updates to users even when the app is not active. These appear in the notification tray and can include text, images, actions, and sounds.
Steps to Implement Notifications in Android
1. Add Required Permission in AndroidManifest.xml
For Android 13+ (API 33), request notification permission:
<uses-permission android:name="android.permission.POST_NOTIFICATIONS"/>2. Create a Notification Channel (For Android 8.0 and Above)
import android.app.NotificationChannel;
import android.app.NotificationManager;
import android.os.Build;

private void createNotificationChannel() {
    if (Build.VERSION.SDK_INT >= Build.VERSION_CODES.O) {
        String channelId = "my_channel";
        CharSequence channelName = "My Notification Channel";
        String channelDescription = "Channel for app notifications";
        int importance = NotificationManager.IMPORTANCE_DEFAULT;

        NotificationChannel channel = new NotificationChannel(channelId, channelName, importance);
        channel.setDescription(channelDescription);

        NotificationManager manager = getSystemService(NotificationManager.class);
        if (manager != null) {
            manager.createNotificationChannel(channel);
        }
    }
}
3. Trigger a Notification (MainActivity.java)
import android.app.Notification;
import android.app.NotificationManager;
import android.app.PendingIntent;
import android.content.Context;
import android.content.Intent;
import androidx.core.app.NotificationCompat;
import android.os.Bundle;
import androidx.appcompat.app.AppCompatActivity;

public class MainActivity extends AppCompatActivity {
    @Override
    protected void onCreate(Bundle savedInstanceState) {
        super.onCreate(savedInstanceState);
        setContentView(R.layout.activity_main);

        createNotificationChannel(); // Ensure the channel exists
        showNotification(); // Show the notification
    }

    private void showNotification() {
        String channelId = "my_channel";

        // Intent to open Activity when notification is clicked
        Intent intent = new Intent(this, MainActivity.class);
        PendingIntent pendingIntent = PendingIntent.getActivity(this, 0, intent, PendingIntent.FLAG_UPDATE_CURRENT);

        // Build the notification
        Notification notification = new NotificationCompat.Builder(this, channelId)
                .setSmallIcon(R.drawable.ic_launcher_foreground) // Notification icon
                .setContentTitle("New Notification")
                .setContentText("This is a sample notification!")
                .setPriority(NotificationCompat.PRIORITY_DEFAULT)
                .setAutoCancel(true) // Removes notification when clicked
                .setContentIntent(pendingIntent) // Open activity on click
                .build();

        // Show the notification
        NotificationManager manager = (NotificationManager) getSystemService(Context.NOTIFICATION_SERVICE);
        if (manager != null) {
            manager.notify(1, notification); // Notify with ID 1
        }
    }
}
4. Running the App
- When the app runs, it creates a notification channel.
- It triggers a notification, which appears in the notification tray.
- Clicking the notification opens the MainActivity.
Features of Android Notifications
✔ Auto-cancel after clicking.
✔ Opens Activity on tap.
✔ Custom Actions (reply, dismiss, open URL).
✔ Supports Images, Sounds, and Vibration.
Use Cases of Notifications
✔ Reminders (e.g., Alarm, Meeting).
✔ Chat Messages (WhatsApp, Telegram).
✔ Background Task Completion (Download Complete).
Conclusion
Android notifications help engage users by providing timely updates and alerts. Using NotificationCompat, apps can ensure notifications work on all Android versions.